Showing posts with label Interests. Show all posts

Sunday, May 22, 2022

Artwork for sale

Off and on over the years, I’ve looked into ways to make my artwork available as posters. After sitting on the fence for a while, I’ve finally opened a store on Zazzle and started uploading a handful of more recent paintings.

I’m still finding my way around Zazzle. The website is ... let’s be restrained and say ... not very friendly.

Sure, it all looks easy enough, but the site seems to go out of its way to make it hard to tell what you’re actually doing, and gives no confidence that you’ve managed to do what you wanted to do. It’s taking a while to figure out some of the quirks, like clicking on “My products” gives different information depending on which part of the site you just came from. And I just created a collection to group all my posters together, and clicking on “Collections” in the menu bar shows the collection I just created, but clicking the same thing from the navigator panel says I don’t have any. Contradictory and confusing as heck!

Oh well, I have started off by creating some posters, all in the region of 40cm by 50cm to 60cm depending on the width to height ratio of the original. That’s 16” by 20” to 24” if you’re still working in Imperial units.

It’s still a work in progress, but you can find my store here:

https://www.zazzle.ca/store/ian_s_bott/products

Saturday, June 18, 2016

iDraw - grids and things

I talked last week about the usefulness of layers in iDraw, and made passing reference to a grid. I’d like to talk a bit more about techniques for measuring and positioning in drawings.

Pretty much any drawing software will have some sort of a grid feature. Like drawing on graph paper, a grid gives you a sense of scale. In software there is also a “Snap to Grid” feature which means as you draw, edges, vertices, end points etc. will always “snap” to the nearest grid lines. This makes it very easy to ensure, for example, that the line you’re drawing is exactly 3.5cm long, rather than just approximately. If you’ve ever tried positioning something on screen using a mouse you’ll know how hard it is to be precise, so the grid makes things easy.

The grid in iDraw allows you to set the spacing between lines, and it is also a two-level grid with thicker lines at intervals that you can also set. For my battleship project, I’ve chosen a grid size to match my drawing scale, so that each big square is 10’ across with 1’ subdivisions. Yes, I was taught metric at school but I still think in feet & inches.
The grid lines are very faint here, but if you click on the image you'll see a larger version. As I mentioned last week, I usually supplement iDraw’s grid with extra placement lines of my own. In this image, a detail of the battleship’s main armament, there is a red line running down the center. I typically use some combination of center lines, boundary lines showing the outside edge, and additional grid lines at suitable intervals, such as a 100’ scale. It depends on the project, I only add what I find useful. These lines go into their own drawing layer so they are easy to hide, and they don’t get in the way and can’t be accidentally selected or moved.

iDraw has another really neat positioning feature. Suppose I want to make a second copy of this object and place it directly underneath the first. I copy and paste as normal...
Then as I move it around, iDraw flashes up vertical and horizontal lines as the object I’m moving comes into alignment with other objects on the page. This tells me when I’m lined up, without having to measure against the grid.
This feature is very useful, though it does have drawbacks. As you move something around these lines flash on and off, and sometimes it’s hard to work out exactly what object it’s aligning to, which might be well off the edge of the screen.

Also I’ve found iDraw will sometimes snap to some alignment it’s detected instead of snapping to the grid. I often look at something and think it looks a little off. I zoom in and find it’s ignored the grid. It’s easy to correct things when you’re zoomed in enough so that the software can distinguish between the competing grid/alignment lines, but the trick is to spot the error in the first place. I’m now in the habit of zooming in periodically to double-check sizes and positioning. I guess that’s the price you pay for making things mostly easy :)

One more thing iDraw is not so good at, especially when it comes to line drawings like this. If you select a collection of lines, squares, boxes etc. it can be tricky to pick them up with the mouse pointer. You have to position the pointer very close to one of the lines, or it thinks you’re making a new selection and will “drop” everything you so carefully selected. This is especially true when you’re zoomed out a long way like in this view...
Individual lines here are hard to see, let alone grab, but in this project I often have details (such as stairwells or elevator shafts) on one deck that I want to copy and paste to the same locations on other decks. To make this easier, you’ll notice some red triangles down the left-hand edge.. If I select a triangle along with the details I want to copy or move, this does two things: it gives me something easier to grab when zoomed further out, and, because I draw those triangles in the angle of my main grid lines, it gives me a reference point to ensure things get properly positioned again. All I have to do is ensure the triangle ends up back in its “home corner”.

Saturday, June 11, 2016

Getting to grips with iDraw - the importance of layers

I’ve blogged about this before, but when I write I’m an enthusiastic drawer of plans and maps to help me visualize the setting. These are usually rough hand-drawn affairs filed in a binder, which works fine for getting the writing done. However I also want to produce more professional-quality images to post to my website to supplement the books.

Since early last year I’ve been getting to grips with iDraw for a variety of drawing projects. I’m a long way from being an expert, but I’m sharing a few things I’ve learned along the way.

One of the most important tips I can suggest for a drawing project of any complexity is to make full use of layers to organize your work. Nowadays I’m in the habit of putting a bit of thought into how best to split things up into layers before I start.

Right now I’m working on probably the most ambitious project to date - a 2000’-long battleship with full deck plans. Here’s the front section profile and part of one of the decks.

It’s not obvious here because all the layers are showing, and iDraw presents them as one image, but the layer arrangement here follows a general pattern that I’ve found useful.

The foundation is a grid. Like most such software, iDraw has an inbuilt grid feature to help with alignment and positioning. This is visible here as a set of faint lines in the background and is not part of the drawing itself. To supplement this, I almost always find it useful to have a much coarser set of reference lines establishing the boundaries of a plan, center lines, or simply a larger scale grid. These are the red lines you see here, and I place them in their own layer.

I always put annotations and labels into their own layer on top of everything else, and then the main content of the drawing goes into one or more layers in between.

Why do this? A number of reasons. For starters there’s the obvious fact that layers are, well, layers. Whenever you add elements to a drawing there’s an implied “Z-order”, a third dimension, which determines which element is in front of which. This can sometimes get messy to sort out, but layers can help simplify things. For example, the labels in this drawing are in their own layer on top of everything else, so they will never get accidentally hidden by anything elsewhere in the plan.

Also for this kind of technical drawing it’s important to be able to select and manipulate lines and other objects once you’ve placed them. Maybe there’s a piece that I want to copy and paste elsewhere, for example, or I need to move a set of walls and doorways over a bit. Having different parts of the diagram held in different layers means that when you’re working in a particular layer, even though you can still see the rest, you can’t inadvertently select elements from anything but the layer you’re working in. In other words all those gridlines and labels don’t get in the way. And if you need a clearer view of the bit you’re working on you can always hide the layers you don’t want to see.

In this example, I chose to keep the gross structural elements - the frame of the ship - separated out into their own layer. Here’s the same picture with the fine detail hidden.

When I finish the drawing and want to publish it, I will choose to hide all those gridlines - an easy job if they’re in their own layer.

iDraw makes it really easy to add and arrange layers. One of the tool palettes lists them all out, and you can add, delete, and move them around easily.

One last use I’ve found is to add actual drawing effects. In this picture of the Emperor’s palace, you see some of the building appear fainter than others, giving an impression of depth.
As a kid did you ever try that trick of creating a foggy landscape by drawing parts on pieces of tracing paper then laying them one on top of each other? I did the same here, by setting up layers for foreground, middle, and distant buildings and placing a semi-transparent layer in between. The tool palette in iDraw has all sorts of options for how to blend each layer into the overall picture, a set of features I’ve only just begun to explore.

Thursday, February 5, 2015

Sci-fi artwork


Whew! After a lot of digital camerawork, uploading, and formatting, I've finally created a gallery of paintings on my website.

I'm missing a handful of older paintings that are sitting at my parents' house back in Guernsey, but there are 25 images on view spanning almost exactly two thirds of my life.

Time for a celebratory beer.

Saturday, December 27, 2014

Guilty pleasures

I guess this is heresy for a writer, but ... *whispers* ... writing is neither my first nor my only artistic love.

*Looks around shiftily, expecting the Spanish Inquisition*

Whereas most writers that I know have had stories bubbling out of their heads for as long as they can remember, I only started writing ten years ago. And I can hardly pretend to have a logjam of story ideas bursting forth.

On the other hand, I was practically born with pencils and crayons in my hands. I think I could draw a pretty mean Dalek long before I could spell it.

So, on to a related confession. I haven't done much writing this month.

I had been on target to finish revising Tiamat's Nest by the end of January. I started the month over 60% done, after an intense three months' work, then hit a tough spot and came to a screeching halt. I've drafted a few sections of The Critique Survival Guide, but I think that's something I'll need to take in easy stages. Non-fiction writing is very different from fiction.

So, rather than beat myself over the head, I'm indulging in some guilty pleasures this month. You can see examples of my paintings on this blog and on my website, but for pure self-indulgence I like to draw plans and maps. I have a fascination for architectural drawings and for ship designs, so I'm having a go at drawing up one of the spaceships from Ghosts of Innocence. Here's the side view in progress, and I'm also working on deck plans. When they're done, I'll post them up to the website as part of the package of background information I'm slowly assembling.

Wednesday, December 18, 2013

More nerdish stuff

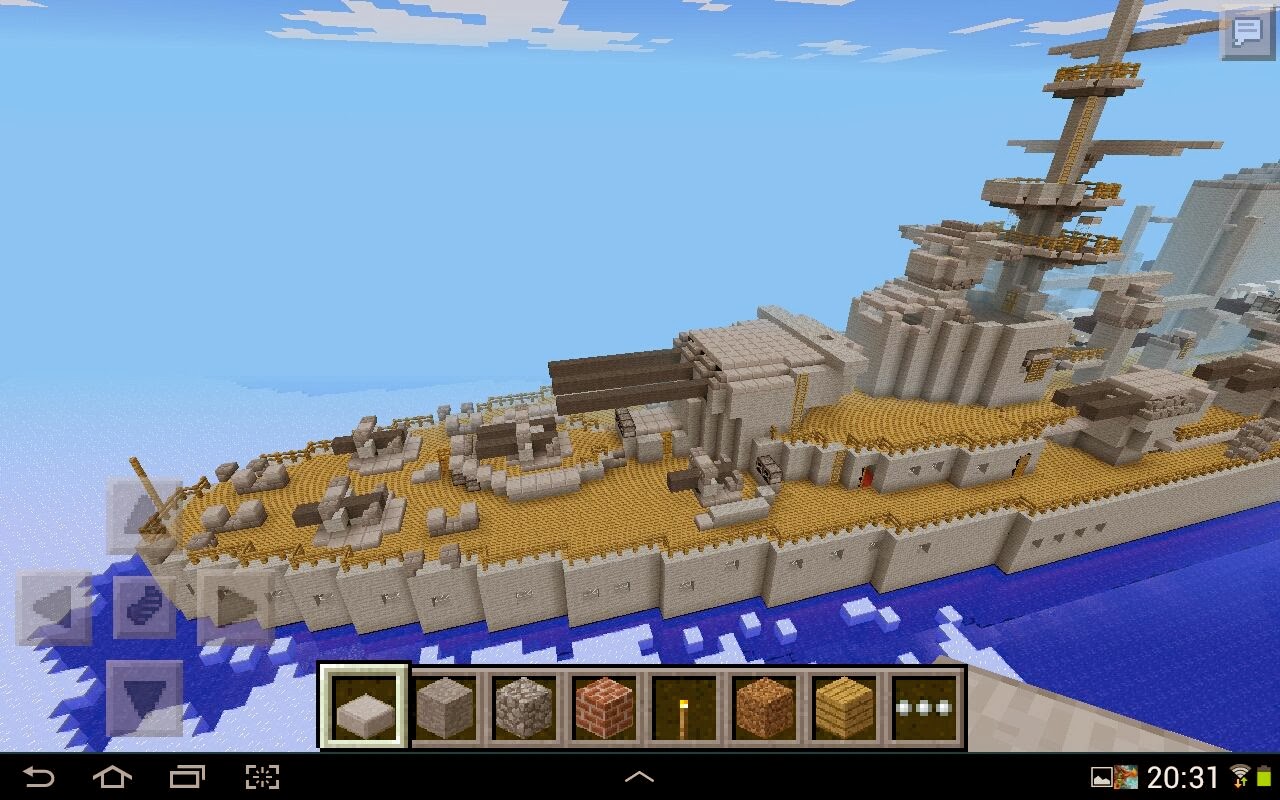
The Minecraft battleship is finished. I don't want to dwell on medical stuff right now*, and everyone is posting about seasonal stuff if they're not doing their regular writing-related posts, so I thought, what the heck, today just to be different you get a tour of the ship.

First off, a general fly down the length from stem to stern. I'm slightly hampered in getting an overall view because the pocket edition of Minecraft only renders things up to a certain distance away, then it vanishes into fog.


So far, a lot like building in Lego. But now the advantage of computer-based work shows. You can land on the deck and take a walk around on and inside. Here is a view of the aft turret from standing on the quarterdeck.

The interior of the ship is all detailed, from the sumptuous admiral's quarters in the stern...
...to the spartan mess decks huddling between the forward turret mountings.
Through a maze of windowless corridors...
To boiler rooms...
Engine rooms...
And workshops...

There's lots more, but that is enough for one post. Another time I might post a more detailed tour as a separate blog page like the others listed under the banner.

* BTW - thanks for your words of support this week. Still awaiting test results but no further symptoms so fingers crossed that will be the end of it.

Friday, November 1, 2013

Minecraft battleship laid bare

Following on from an earlier post, as the hull rises above sea level, here is a bird's eye view of the main deck fully laid out and furnished.

This is the only level on the ship where you can walk from stem to stern under cover. Below here, shown in my previous post but now decked over, the ship is divided by transverse bulkheads into twelve separate compartments for machinery, magazines, and storage. Above, still to be built, the covered area will only extend from the bow to level with the funnel before breaking up into the aft superstructure.

This deck is the main living and working area of the ship. From the stern...
...the view is dominated by the aft 16" turret now sitting on top of its barbette. To the far left are the spacious admiral's quarters, then officers' accommodation.

The midships section contains the wardroom, sick bay, chapel, bakery, laundry room, washrooms, and offices.

The towers along either side are the 6" gun supports, which will be topped off by twin gun turrets. Then we come to the bow section mostly consisting of crew mess decks.

Again, everything is overshadowed by the massive three-gun turrets of the main armament.

Sunday, October 20, 2013

The nerd within

I've always been an avid builder, needing to create things from some blueprint or other in my mind. As a child, this showed up in the hours I spent playing with Lego and Plasticine (modeling clay), and later on building model planes, tanks, and ships. Warships were my favorite. I was always absorbed by their visual appearance and physical intricacy.

Nowadays, my creative urges are fulfilled by all those grown-up building projects over the years, such as the pirate ship and tree fort, by writing and painting, and occasional wistful plans for when we win the lottery.

All these things take a lot of energy and concentration, and sometimes I feel the need for less demanding outlets, something that brings more immediate gratification. For this, I've turned to Minecraft. I use the Pocket Edition in Creative mode, solely for construction projects.

Right now, I'm building a WWII-era battleship - generic design, not meant to represent any real vessel. I did one of these a while back, just to see if I could, but at that time I only focused on the exterior. Apart from the engineering spaces it was an empty shell.

This time around, I'm building it from the keel up and trying to make a fairly realistic representation.

I've also discovered that this kind of thing is a popular subject in the Minecraft community (try Googling "Minecraft battleship" for some examples), which is kinda scary. I guess it officially reinforces my nerd status :)

So, I know this may be of limited interest to "normal" people out there, but what the heck, this is my blog and you can always skip if this isn't your cup of tea.

Here are a few screen shots of the battleship project as it takes shape up to the waterline, so if you'd like, follow me on a guided tour of the lower levels...

This is the stern of the ship. I researched online for a game seed that would give me a lot of water, because I knew the ship would stretch most of the width of the world. In this case there was ice along one side, so the bum end wound up embedded in the ice.
You can see storage compartments, and three propeller shafts in yellow. The green platform rising up beyond them is the base of the after 16" barbette. The cylindrical rotating structure and gun turret will be built on top of that. On either side, the powder magazines deep in the ship are still exposed.

Next, we have the engine rooms. The after room holds two sets of turbines driving the outer shafts. Next door is the central turbine set flanked by steam condensers and other machinery.

A large part of the spadework up to this point involved building the shell of the hull and emptying it of water. This is one of the reasons my first attempt didn't pay too much attention to the interior. It's difficult working underwater in Minecraft because it gets so dark, and emptying out the water is painstaking work. But I'm glad I put the effort in this time, because this gives me a more complete structure to fill in.

Here is a side-on view of the three boiler rooms. I've used blue blocks to represent the funnel uptakes. The forward uptakes will continue curving aft to meet up, giving me a single large funnel.
Forward of the boiler rooms is the electrical generation room, and the base of "B" turret rising high above the waterline. In this view, you also have a clear view of the white columns rising up, four each side, which are the 6" shell hoists for the secondary armament.

Finally, we come to the bow section.
Mostly storage here, and a clear view of the two forward 16" emplacements. "B" turret still has the powder magazine showing, while I've started building the overlying shell room for "A" turret.

Next stage is to finish off the sections showing, and deck them over ready to start the next level.

Yes, nerdy I know, but I find it strangely therapeutic.
Related Posts Plugin for WordPress, Blogger...